Posts

Showing posts with the label Halloween

Evil pumkin

Image
Just a cute, evil-looking pumpkin as part of my annual Halloween decorations. The pattern used is by Tessa van Riet-Ernst ( https://woolytoons.com/ ).     If you want to go for a more grown-up look for your autumn decorations, I've written a pattern for some less cartoony pumpkin decorations here .     Text  

Pumpkin display (free patterns)

Image
Never too early to start thinking about autumn decorations! These pumpkins are really easy to make and are crocheted in rows, not rounds to achieve that nice ribbing effect.   You can of course make them in less cartoony colours to suit your home decor a bit better, like mauve or brown.  In fact, a friend of mine used to grow pink pumpkins! You can find the pattern for the big pumpkin here , and the pattern for the two smaller ones here . Of course, you can mix and match stalks, bottoms and bodies to create differently sized and shaped ornaments. I've used cotton SMC Catania yarn, suitable for a 2.00-2.50mm hook.

Big pumpkin (free pattern)

Image
The pattern for the big pumpkin is very similar to that of the small pumpkin, but scaled up slightly. Just make sure that your work is loose enough so that the the sides don't crumple too much when you cinch in the sides. Big pumpkin: Body: R1. Ch 26 in orange (26) R2. Sc into the backbump of every stitch starting with the 2nd stitch on the hook (25) R3-54. Sc into the back loop of every stitch (25) Fasten off and leave a long tail for sewing. Use this tail to sew the two short ends together. Then fold the pumpkin inside out.  Cut of two lengths of yarn and weave each one into the long sides of the crochet work and pull them tight to squeeze the rectangle into a sphere. Stuff with fiberfill and tie down the ends and weave in.  Top: Start a magic ring in green. R1. Sc 6 into the magic ring (6) R2-6. Sc into every stitch (6) R7. Sc2 into every stitch (12) R8. Sc2 into every 2nd stitch (18) End with a slip stitch and fasten off, leaving a long tail. Use this tail to sew the ...

Small pumpkin (free pattern)

Image
The bodies of these pumpkins are crocheted in rows, not in the round. The tops and bottoms in green are crocheted using the in the round technique.   Small pumpkin: Body: R1. Ch 17 in orange (17) R2. Starting with the 2nd stitch of the hook, sc into the "backbump" of every stitch . Ch 1 (16) R3-34. Sc into every stitch in back loops only. Ch 1 (16)  Fasten off and leave a long tail for sewing. Use this tail to sew the two short ends together. Then fold the pumpkin inside out.  Cut of two lengths of yarn and weave each one into the long sides of the crochet work and pull them tight to squeeze the rectangle into a sphere. Stuff with fiberfill and tie down the ends and weave in.  Top:  Start a magic ring in green. R1. Sc 6 in the magic ring (6) R2-3. Sc into every stitch (6) R4. Sc2 into every stitch (12) End with a slip stitch and fasten off, leaving a long tail. Use this tail to sew the stalk onto the top of the pumpkin.  Top with vines: Start a magic r...

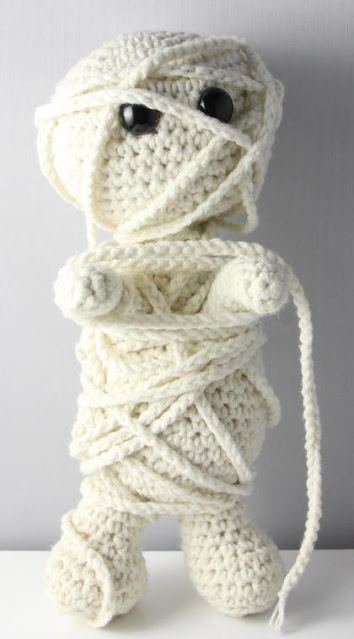
Ramses the Mummy

Image
This may very well have been my first ever crochet project, taken from a book on monsters and creatures by Tessa van Riest-Ernst . At the time, I was not yet comfortable swapping yarns or adapting patterns and I remember going to loads of different shops to get the specific types of yarns she mentioned in her pattern.  Looking back at it, I can spot all the mistakes I made. The stitches are too loose, some of the stuffing is visible and the seams where the various parts are sewn together are a bit sloppy. But I wouldn't change this little mummy for the world, because he's cute as he is and he shows me how much I've improved over the years as a crocheter. Also, he has firmly found his place in our living room hiding between my husband's classic horror DVD's.  Ramses is made with a 3.00mm hook and some cream-coloured Scheepjes Softfun (2426). The eyes are black 6mm safetey eyes. The body and head are stuffed with fiberfill and the legs and arms with a combination of ...

Witch with black cat

Image
As a child and young adult, I always wanted to learn how to crochet, but never had the courage to try it (my mother always said it was really difficult). As a result, I always muddled along knitting and embroidering (neither of which I was particularly good at), but never daring to venture into the magical realm of the crochet hook. Until I saw a book by the brilliant Dutch designer Tessa van Riest-Ernst with all these cute little crocheted monsters and creatures and I knew I had to get over my fears. And, as it turned out, my mother was absolutely demonstrably wrong and my love of crocheting was awakened.  This witch with cat pattern was the final pattern in the book, and by the looks of it the most complicated. Again, it took me a few years to attempt it and I'm really happy with how they turned out. The cat, with its forlorn eyes, is especially amusing.   I'm also really pleased with how the hair turned out, I was a little sceptical at first that it would cover the en...

Frankenstein's Monster

Image
One of the very first amigurumi I ever made, and as you can see by the amount of dust he's collected, it's been awhile! He's made from a pattern by Tessa van Riet in her brilliant series of monster amigurumi.  At the time, I couldn't get the type of yarn she recommended for the head and hands and I remember spending a long day in Amsterdam trying different craft shops to find something suitable. In the end, I bought some hideously expensive Texan hand-dyed merino wool as it was the only thing I could find in the right sickly colour! And I only needed a couple of strands...